


OAuth2
OAuth2运行流程
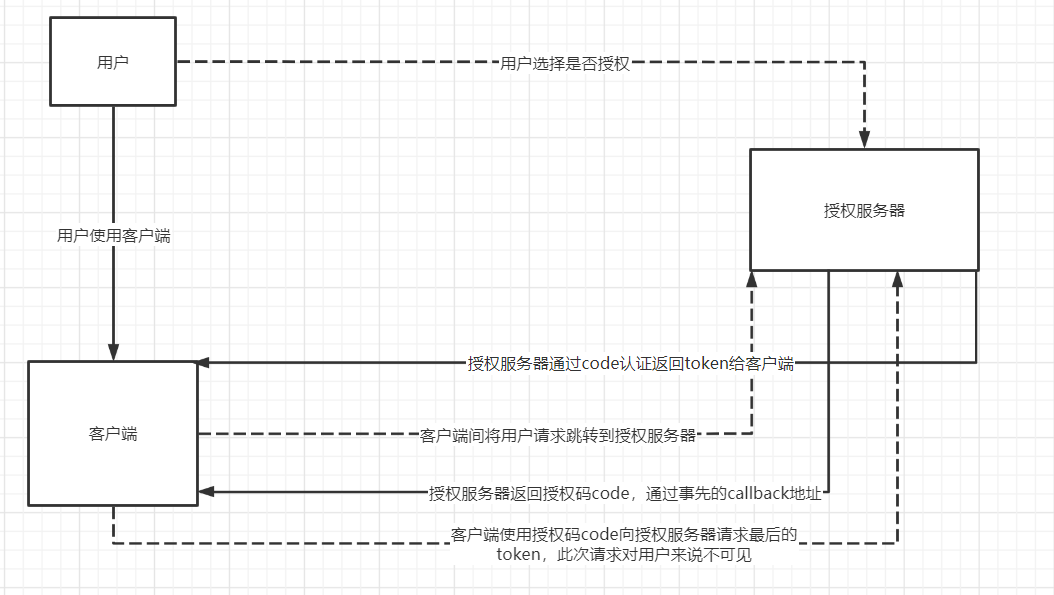
授权码模式的认证流程

- (A)用户打开客户端以后,客户端要求用户给予授权。
- (B)用户同意给予客户端授权。
- (C)客户端使用上一步获得的授权,向认证服务器申请令牌。
- (D)认证服务器对客户端进行认证以后,确认无误,同意发放令牌。
- (E)客户端使用令牌,向资源服务器申请获取资源。
- (F)资源服务器确认令牌无误,同意向客户端开放资源。
OAuth2授权模式
客户端必须得到用户的授权(Authorization Grant),才能获得访问令牌(Access Token)。
OAuth2.0 定义了四种授权方式:
- 授权码模式(Authorization Code)
- 密码模式(Resource Owner Password Credentials)
- 简化模式(Implicit)
- 客户端模式(Client Credentials)
其中,密码模式和授权码模式比较常用。
授权码模式

具体而言,网页授权流程分为四步:
- 1、引导用户进入授权页面同意授权,获取 code
- 2、通过 code 换取网页授权 access_token(与基础支持中的 access_toke n不同)
- 3、如果需要,开发者可以刷新网页授权 access_token,避免过期
- 4、通过网页授权 access_token 和 openid 获取用户基本信息(支持 UnionID 机制)
密码模式
用户向客户端提供自己的用户名和密码。客户端使用该用户提供的用户名和密码向授权服务器索要授权
在这种模式中,用户必须把自己的密码给客户端,但是客户端不得储存密码。这通常用在用户对客户端高度信任的情况下,比如客户端是操作系统的一部分,或者由一个著名公司出品。而授权服务器只有在其他授权模式无法执行的情况下,才能考虑使用这种模式。
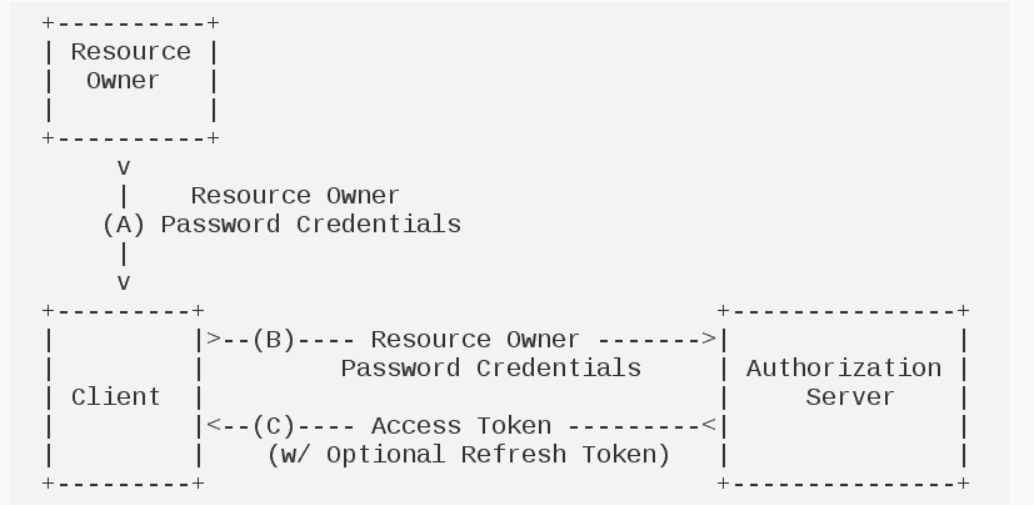
- (A)用户向客户端提供用户名和密码。
- (B)客户端将用户名和密码发给授权服务器,向后者请求令牌。
- (C)授权服务器确认无误后,向客户端提供访问令牌。
密码模式示例
<?xml version="1.0" encoding="UTF-8"?>
<project xmlns="http://maven.apache.org/POM/4.0.0" xmlns:xsi="http://www.w3.org/2001/XMLSchema-instance"
         xsi:schemaLocation="http://maven.apache.org/POM/4.0.0 https://maven.apache.org/xsd/maven-4.0.0.xsd">
    <modelVersion>4.0.0</modelVersion>
    <groupId>com.qingtian.oauth2</groupId>
    <artifactId>oauth2demo</artifactId>
    <version>0.0.1-SNAPSHOT</version>
    <name>oauth2demo</name>
    <description>Demo project for Spring Boot</description>

    <properties>
        <java.version>1.8</java.version>
        <project.build.sourceEncoding>UTF-8</project.build.sourceEncoding>
        <project.reporting.outputEncoding>UTF-8</project.reporting.outputEncoding>
        <spring-boot.version>2.2.4.RELEASE</spring-boot.version>
    </properties>

    <dependencies>
        <dependency>
            <groupId>org.springframework.boot</groupId>
            <artifactId>spring-boot-starter</artifactId>
        </dependency>

        <dependency>
            <groupId>org.springframework.boot</groupId>
            <artifactId>spring-boot-starter-test</artifactId>
            <scope>test</scope>
            <exclusions>
                <exclusion>
                    <groupId>org.junit.vintage</groupId>
                    <artifactId>junit-vintage-engine</artifactId>
                </exclusion>
            </exclusions>
        </dependency>
        <!-- 实现对 Spring MVC 的自动配置 -->
        <dependency>
            <groupId>org.springframework.boot</groupId>
            <artifactId>spring-boot-starter-web</artifactId>
        </dependency>

        <!-- 实现对 Spring Security OAuth2 的自动配置 -->
        <dependency>
            <groupId>org.springframework.security.oauth.boot</groupId>
            <artifactId>spring-security-oauth2-autoconfigure</artifactId>
            <version>${spring-boot.version}</version>
        </dependency>
    </dependencies>

    <dependencyManagement>
        <dependencies>
            <dependency>
                <groupId>org.springframework.boot</groupId>
                <artifactId>spring-boot-dependencies</artifactId>
                <version>${spring-boot.version}</version>
                <type>pom</type>
                <scope>import</scope>
            </dependency>
        </dependencies>
    </dependencyManagement>

    <build>
        <plugins>
            <plugin>
                <groupId>org.apache.maven.plugins</groupId>
                <artifactId>maven-compiler-plugin</artifactId>
                <version>3.8.1</version>
                <configuration>
                    <source>1.8</source>
                    <target>1.8</target>
                    <encoding>UTF-8</encoding>
                </configuration>
            </plugin>
            <plugin>
                <groupId>org.springframework.boot</groupId>
                <artifactId>spring-boot-maven-plugin</artifactId>
                <version>2.3.7.RELEASE</version>
                <configuration>
                    <mainClass>com.qingtian.oauth2demo.Oauth2demoApplication</mainClass>
                </configuration>
                <executions>
                    <execution>
                        <id>repackage</id>
                        <goals>
                            <goal>repackage</goal>
                        </goals>
                    </execution>
                </executions>
            </plugin>
        </plugins>
    </build>

</project>
创建SecurityConfig配置类
/**
 * @author qingtian
 * @date 2021/8/8 19:11
 */

@Configuration
@EnableWebSecurity
public class SecurityConfig extends WebSecurityConfigurerAdapter {

    @Override
    @Bean(name = BeanIds.AUTHENTICATION_MANAGER)
    public AuthenticationManager authenticationManagerBean() throws Exception {
        return super.authenticationManagerBean();
    }

//    @Bean
//    public static BCryptPasswordEncoder passwordEncoder() {
//        return new BCryptPasswordEncoder();
//    }

    @Bean
    public static NoOpPasswordEncoder passwordEncoder() {
        return (NoOpPasswordEncoder) NoOpPasswordEncoder.getInstance();
    }

    @Override
    protected void configure(AuthenticationManagerBuilder auth) throws Exception {

        auth.inMemoryAuthentication()
                .withUser("qingtian").password("123").roles("USER");
    }
}
创建OAuth2AuthorizationServerConfig配置类
/**
 * @author qingtian
 * @date 2021/8/8 19:15
 */

@Configuration
@EnableAuthorizationServer
public class OAuth2AuthorizationServerConfig extends AuthorizationServerConfigurerAdapter {


    /**
     * 用户认证manger
     */
    @Autowired
    private AuthenticationManager authenticationManager;


    @Override
    public void configure(AuthorizationServerEndpointsConfigurer endpoints) throws Exception {
        endpoints.authenticationManager(authenticationManager);
    }

    @Override
    public void configure(AuthorizationServerSecurityConfigurer oauthServer) throws Exception {
        oauthServer.checkTokenAccess("isAuthenticated()");
    }

    @Override
    public void configure(ClientDetailsServiceConfigurer clients) throws Exception {
        clients.inMemory() // <4.1>
                .withClient("clientapp").secret("112233") // <4.2> Client 账号、密码。
                .authorizedGrantTypes("password") // <4.2> 密码模式
                .scopes("read_userinfo", "read_contacts") // <4.2> 可授权的 Scope
//                .and().withClient() // <4.3> 可以继续配置新的 Client
        ;
    }
}
简单测试
POST 请求 http://localhost:8081/oauth/token 地址,使用密码模式进行授权。如下图所示:
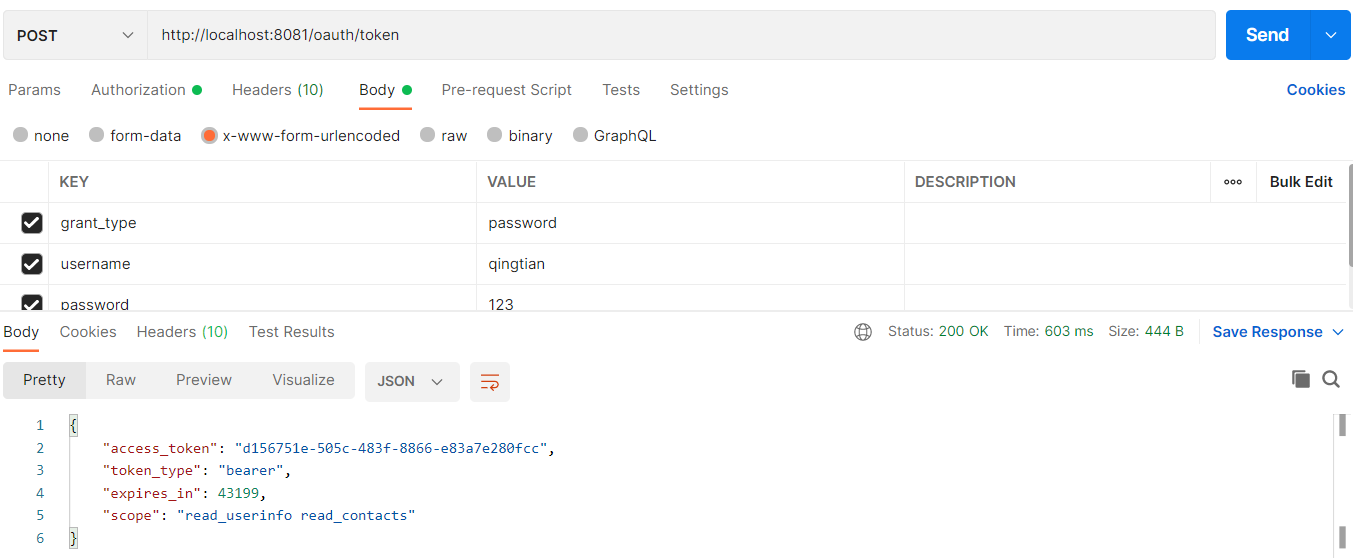
- 响应字段
access_token为访问令牌,后续客户端在访问资源服务器时,通过它作为身份的标识。 - 响应字段
token_type为令牌类型,一般是bearer或是mac类型。 - 响应字段
expires_in为访问令牌的过期时间,单位为秒。 - 响应字段
scope为权限范围
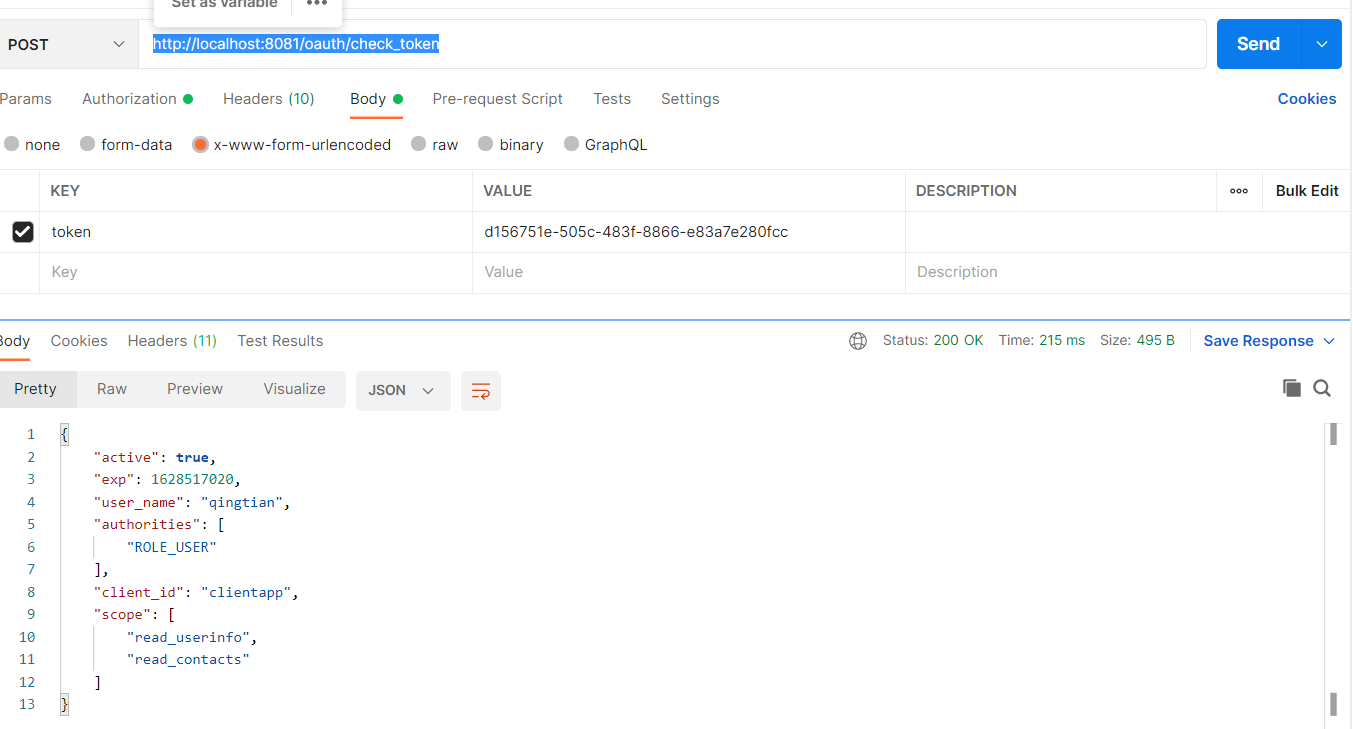
post请求http://localhost:8081/oauth/check_token 地址,校验token有效性
搭建资源服务器
创建application.yml配置
server:
  port: 9090

security:
  oauth2:
    # OAuth2 Client 配置,对应 OAuth2ClientProperties 类
    client:
      client-id: clientapp
      client-secret: 112233
    # OAuth2 Resource 配置,对应 ResourceServerProperties 类
    resource:
      token-info-uri: http://127.0.0.1:8081/oauth/check_token # 获得 Token 信息的 URL
    # 访问令牌获取 URL,自定义的
    access-token-uri: http://127.0.0.1:8081/oauth/token
① security.oauth2.client 配置项,OAuth2 Client 配置,对应 OAuth2ClientProperties 类。在这个配置项中,我们添加了客户端的 client-id 和 client-secret。
为什么要添加这个配置项呢?因为资源服务器会调用授权服务器的 /oauth/check_token 接口,而考虑到安全性,我们配置了该接口需要进过客户端认证。
② security.oauth2.resource 配置项,OAuth2 Resource 配置,对应 ResourceServerProperties 类。
这里,我们通过 token-info-uri 配置项,设置使用授权服务器的 /oauth/check_token 接口,校验访问令牌的有效性。
③ security.access-token-uri 配置项,是我们自定义的,设置授权服务器的 oauth/token 接口,获取访问令牌。因为稍后我们将在 LoginController中,实现一个 /login 登录接口。
创建OAuth2ResourceServerConfig,进行资源服务器配置
/**
 * @author qingtian
 * @date 2021/8/9 10:17
 */
@Configuration
@EnableResourceServer
public class OAuth2ResourceServerConfig extends ResourceServerConfigurerAdapter {

    @Override
    public void configure(HttpSecurity http) throws Exception {
        http.authorizeRequests()
                // 设置 /login 无需权限访问
                .antMatchers("/login").permitAll()
                // 设置其它请求,需要认证后访问
                .anyRequest().authenticated()
        ;
    }
}
① 在类上添加 @EnableResourceServer 注解,声明开启 OAuth 资源服务器的功能。
同时,继承 ResourceServerConfigurerAdapter 类,进行 OAuth 资源服务器的配置。
② #configure(HttpSecurity http) 方法,设置 HTTP 权限。这里,我们设置 /login 接口无需权限访问,其它接口认证后可访问。
这样,客户端在访问资源服务器时,其请求中的访问令牌会被资源服务器调用授权服务器的 /oauth/check_token 接口,进行校验访问令牌的正确性。
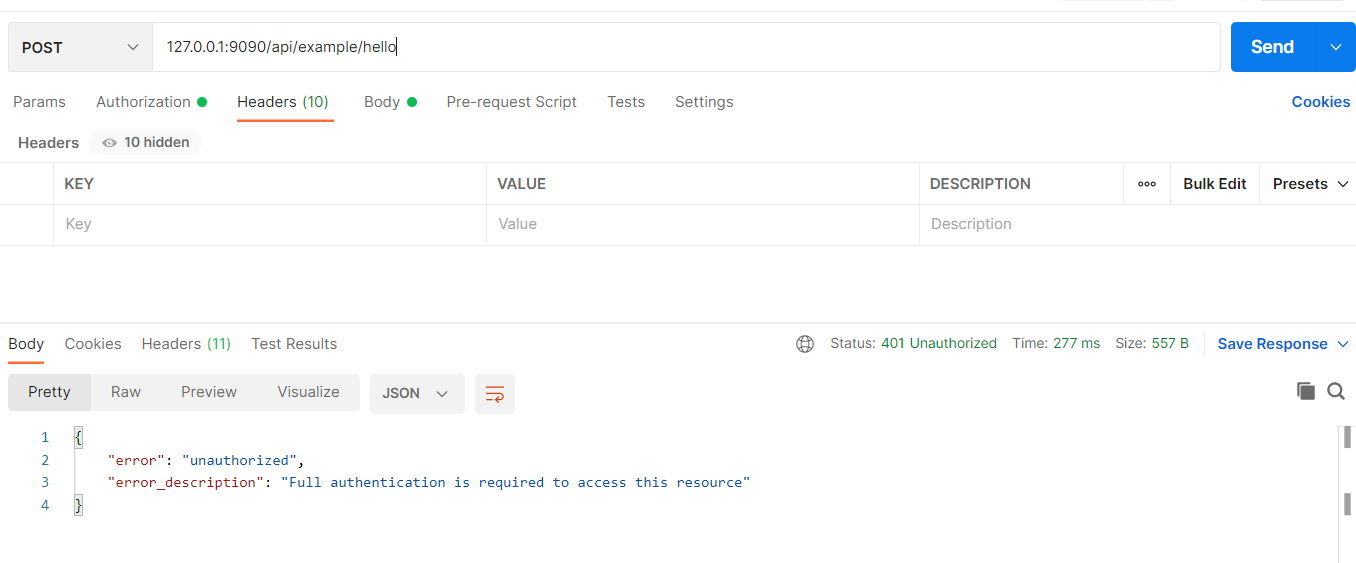
不带令牌访问127.0.0.1:9090/api/example/hello
使用错误的令牌访问127.0.0.1:9090/api/example/hello
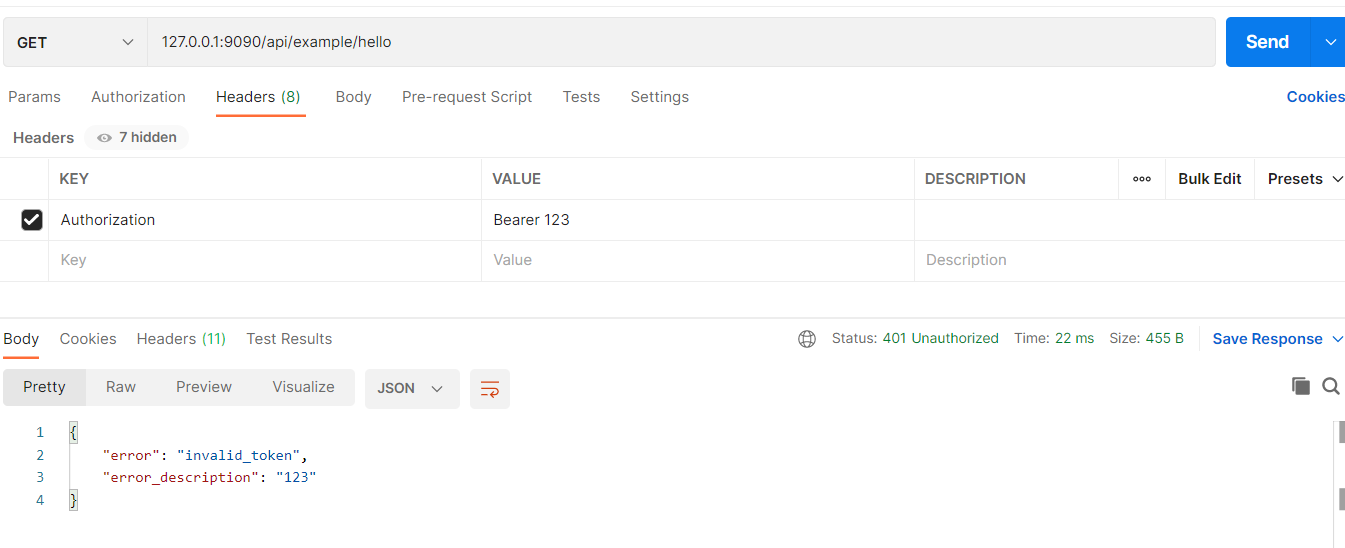
友情提示:访问令牌需要在请求头
"Authorization"上设置,并且以"Bearer "开头。
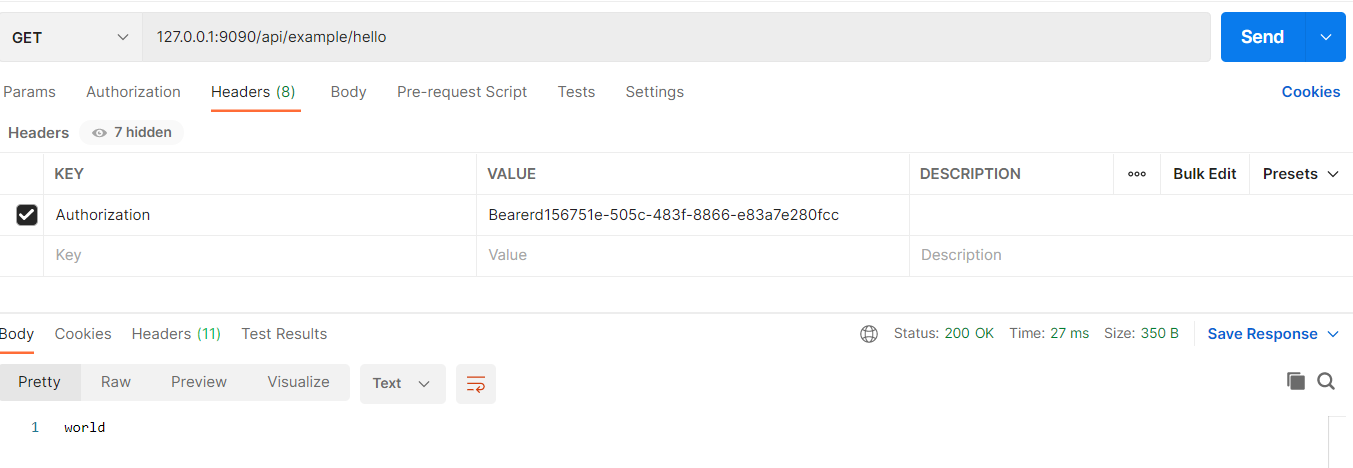
使用正确的令牌访问127.0.0.1:9090/api/example/hello
创建LoginController
/**
 * @author qingtian
 * @date 2021/8/9 12:42
 */
@RestController
@RequestMapping("/")
public class LoginController {

    @Autowired
    private OAuth2ClientProperties oauth2ClientProperties;

    @Value("${security.oauth2.access-token-uri}")
    private String accessTokenUri;

    @PostMapping("/login")
    public OAuth2AccessToken login(@RequestParam("username") String username,
                                   @RequestParam("password") String password) {
        // <1> 创建 ResourceOwnerPasswordResourceDetails 对象
        ResourceOwnerPasswordResourceDetails resourceDetails = new ResourceOwnerPasswordResourceDetails();
        resourceDetails.setAccessTokenUri(accessTokenUri);
        resourceDetails.setClientId(oauth2ClientProperties.getClientId());
        resourceDetails.setClientSecret(oauth2ClientProperties.getClientSecret());
        resourceDetails.setUsername(username);
        resourceDetails.setPassword(password);
        // <2> 创建 OAuth2RestTemplate 对象
        OAuth2RestTemplate restTemplate = new OAuth2RestTemplate(resourceDetails);
        restTemplate.setAccessTokenProvider(new ResourceOwnerPasswordAccessTokenProvider());
        // <3> 获取访问令牌
        return restTemplate.getAccessToken();
    }
}
在 /login 接口中,资源服务器扮演的是一个 OAuth 客户端的角色,调用授权服务器的 /oauth/token 接口,使用密码模式进行授权,获得访问令牌。
① <1> 处,创建 ResourceOwnerPasswordResourceDetails 对象,填写密码模式授权需要的请求参数。
② <2> 处,创建 OAuth2RestTemplate 对象,它是 Spring Security OAuth 封装的工具类,用于请求授权服务器。
同时,将 ResourceOwnerPasswordAccessTokenProvider 设置到其中,表示使用密码模式授权。
③ <3> 处,调用 OAuth2RestTemplate 的 #getAccessToken() 方法,调用授权服务器的 /oauth/token 接口,进行密码模式的授权。
注意,OAuth2RestTemplate 是有状态的工具类,所以需要每次都重新创建。
测试
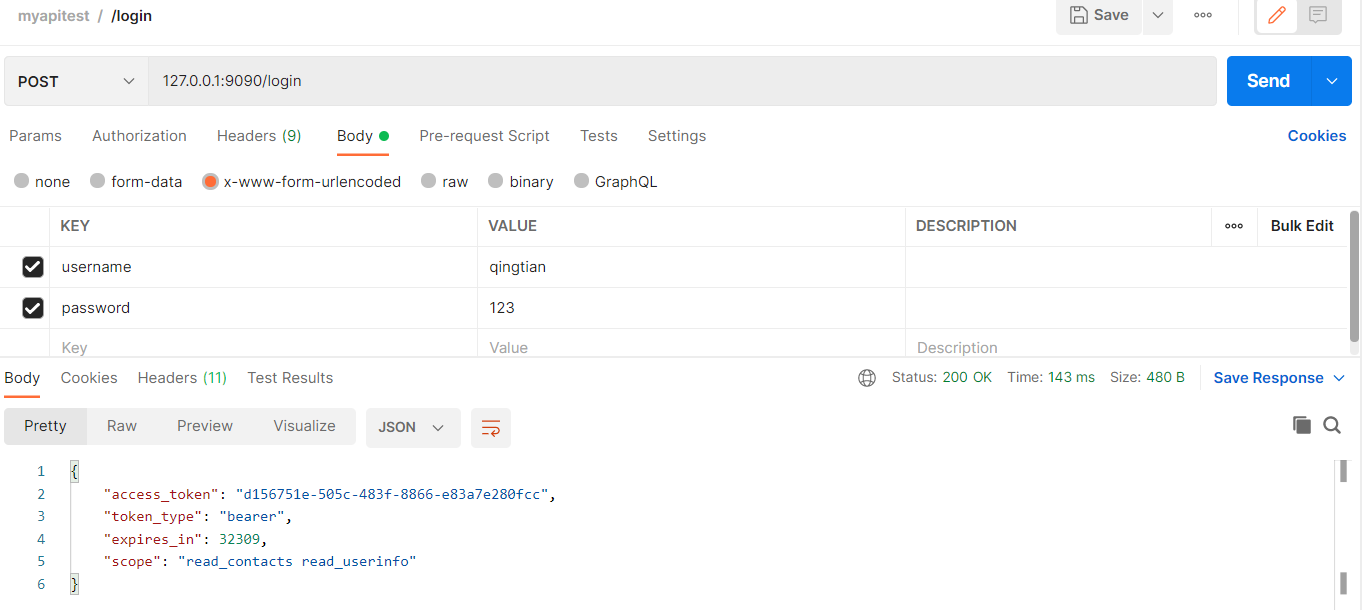
请求 http://127.0.0.1:9090/login 接口,使用用户的用户名与密码进行登录,获得访问令牌。如下图所示
授权码模式示例
授权码模式,是功能最完整、流程最严密的授权模式。它的特点就是通过客户端的后台服务器,与授权务器进行互动。
搭建授权服务器
只需要修改OAuth2AuthorizationServerConfig类
@Configuration
@EnableAuthorizationServer
public class OAuth2AuthorizationServerConfig extends AuthorizationServerConfigurerAdapter {


    /**
     * 用户认证manger
     */
    @Autowired
    private AuthenticationManager authenticationManager;


    @Override
    public void configure(AuthorizationServerEndpointsConfigurer endpoints) throws Exception {
        endpoints.authenticationManager(authenticationManager);
    }

    @Override
    public void configure(AuthorizationServerSecurityConfigurer oauthServer) throws Exception {
        oauthServer.checkTokenAccess("isAuthenticated()");
    }

    @Override
    public void configure(ClientDetailsServiceConfigurer clients) throws Exception {
        clients.inMemory() // <4.1>
                .withClient("clientapp").secret("112233") // <4.2> Client 账号、密码。
                .authorizedGrantTypes("authorization_code") // <4.2> 授权码模式
                .redirectUris("http://127.0.0.1:9090/callback") //回调地址
                .scopes("read_userinfo", "read_contacts") // <4.2> 可授权的 Scope
//                .and().withClient() // <4.3> 可以继续配置新的 Client
        ;
    }
}
简单测试
执行 AuthorizationServerApplication 启动授权服务器。
① 使用浏览器,访问 http://127.0.0.1:8081/oauth/authorize?client_id=clientapp&redirect_uri=http://127.0.0.1:9090/callback&response_type=code&scope=read_userinfo 地址,获取授权。请求参数说明如下:
client_id参数,必传,为我们在 OAuth2AuthorizationServer 中配置的 Client 的编号。redirect_uri参数,可选,回调地址。当然,如果client_id对应的 Client 未配置redirectUris属性,会报错。response_type参数,必传,返回结果为code授权码。scope参数,可选,申请授权的 Scope 。如果多个,使用逗号分隔。state参数,可选,表示客户端的当前状态,可以指定任意值,授权服务器会原封不动地返回这个值。
因为我们并未登录授权服务器,所以被拦截跳转到登录界面。如下图所示:
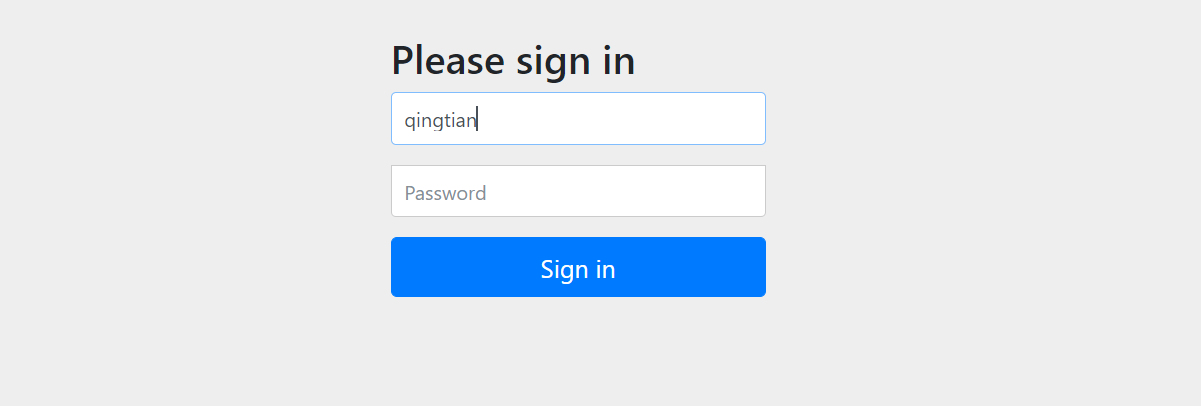
输入用户名和密码
出现是否授权页面
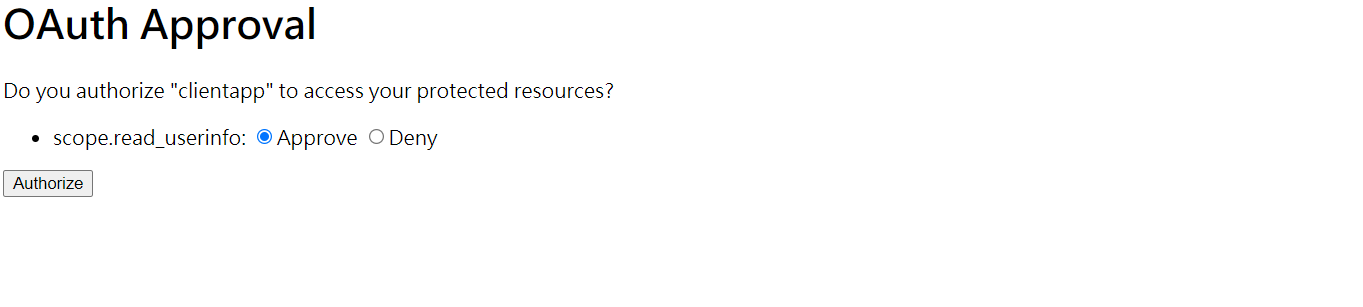 选择
选择 scope.read_userinfo 为 Approve 允许,点击「Authorize」按钮,完成授权操作。浏览器自动重定向到 Redirection URI 地址,并且在 URI 上可以看到 code 授权码。如下图所示:
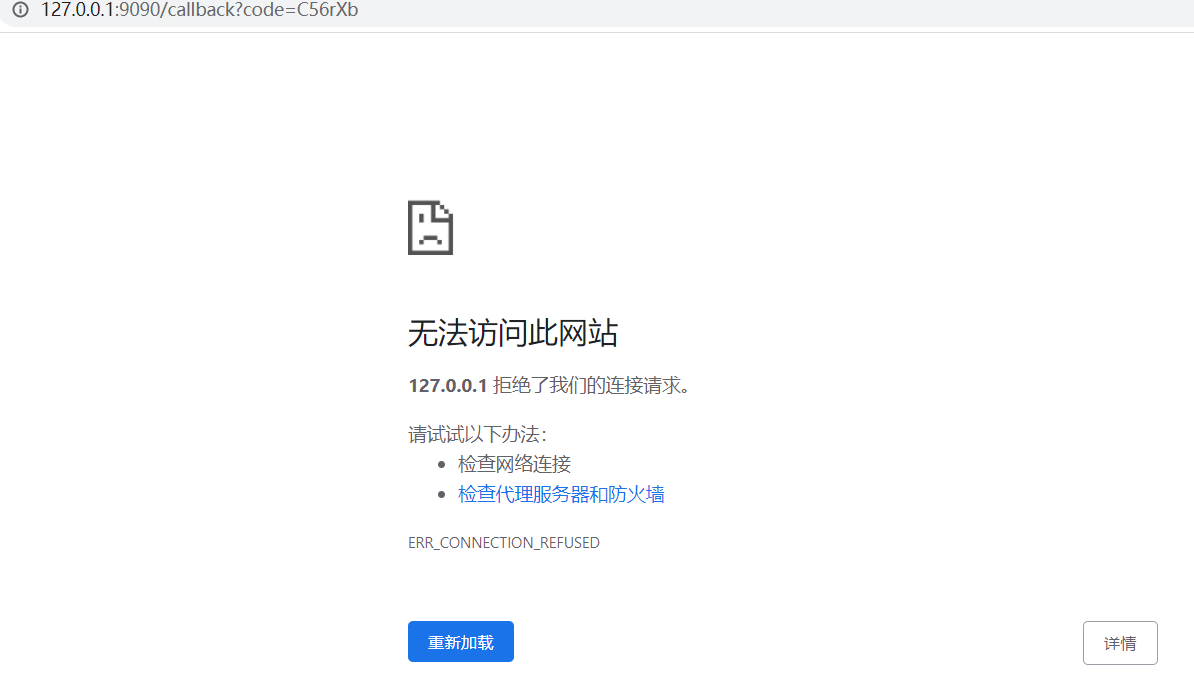
因为我们暂时没有启动资源服务器,所以显示无法访问。这里,我们先使用 Postman 模拟请求 http://localhost:8081/oauth/token 地址,使用授权码获取到访问令牌。如下图所示:
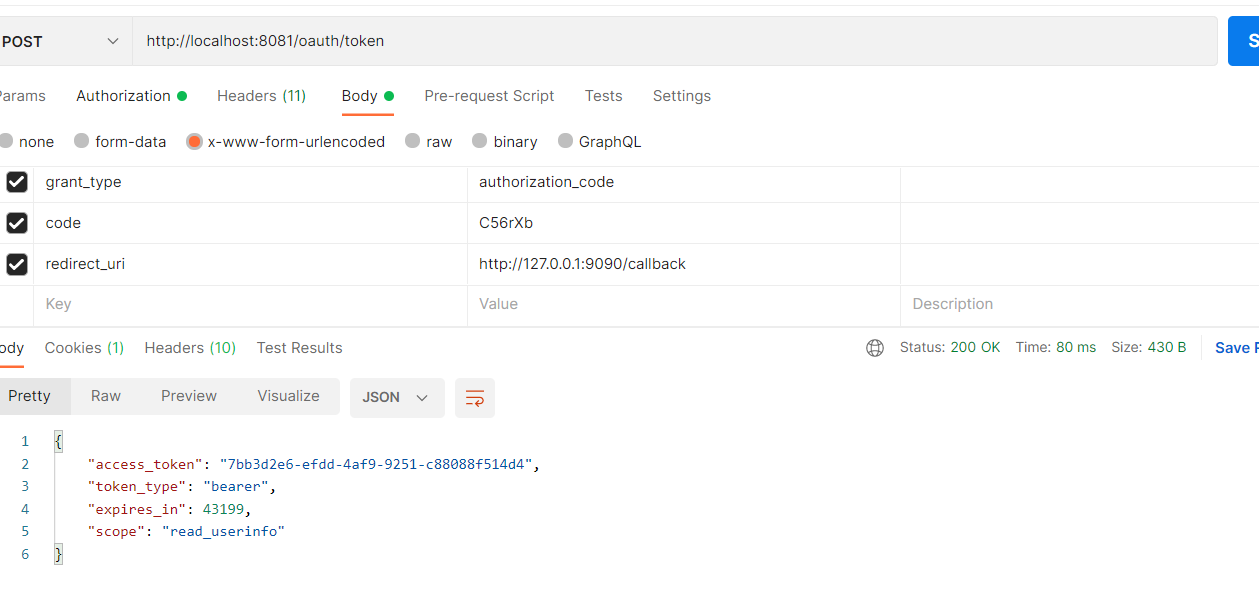
请求说明:
- 通过 Basic Auth 的方式,填写
client-id+client-secret作为用户名与密码,实现 Client 客户端有效性的认证。 - 请求参数
grant_type为"authorization_code",表示使用授权码模式。 - 请求参数
code,从授权服务器获取到的授权码。 - 请求参数
redirect_uri,Client 客户端的 Redirection URI 地址。
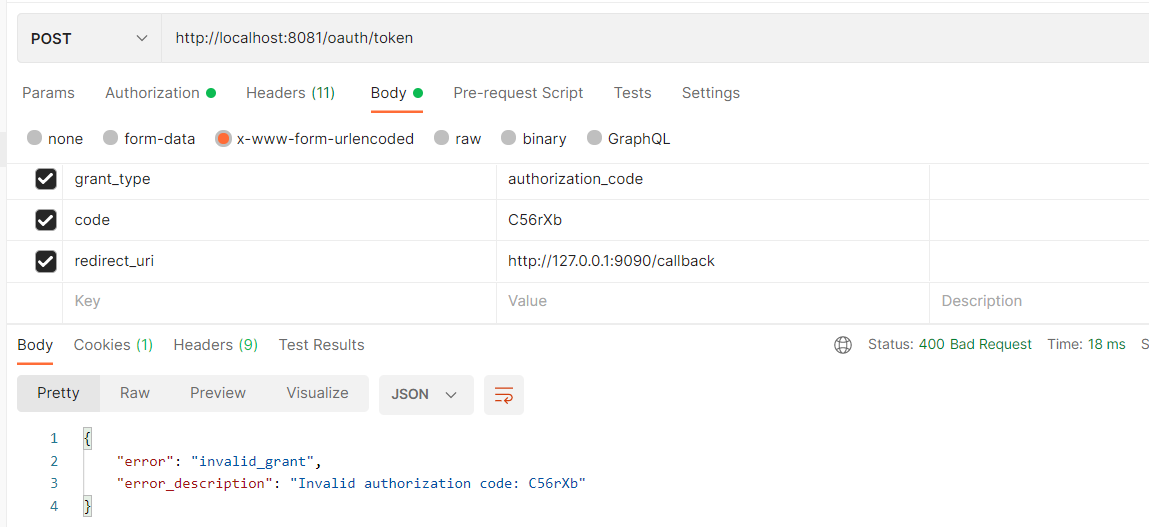
注意:授权码只能使用一次,如重复使用则:
搭建资源服务器
主要修改部分有两处
- 新建
CallbcakController类用于提供callback()回调方法 - 在
OAuth2ResourceServerConfig类中配置无需权限访问/callback路径
@Configuration
@EnableResourceServer
public class OAuth2ResourceServerConfig extends ResourceServerConfigurerAdapter {

    @Override
    public void configure(HttpSecurity http) throws Exception {
        http.authorizeRequests()
                // 设置 /login 无需权限访问
                .antMatchers("/login").permitAll()
                .antMatchers("/callback").permitAll()
                // 设置其它请求,需要认证后访问
                .anyRequest().authenticated()
        ;
    }
}
/**
 * @author qingtian
 * @date 2021/8/9 14:58
 */
@RestController
@RequestMapping("/")
public class CallbackController {

    @Autowired
    private OAuth2ClientProperties oauth2ClientProperties;

    @Value("${security.oauth2.access-token-uri}")
    private String accessTokenUri;

    @GetMapping("/callback")
    public OAuth2AccessToken login(@RequestParam("code") String code) {
        // 创建 AuthorizationCodeResourceDetails 对象
        AuthorizationCodeResourceDetails resourceDetails = new AuthorizationCodeResourceDetails();
        resourceDetails.setAccessTokenUri(accessTokenUri);
        resourceDetails.setClientId(oauth2ClientProperties.getClientId());
        resourceDetails.setClientSecret(oauth2ClientProperties.getClientSecret());
        // 创建 OAuth2RestTemplate 对象
        OAuth2RestTemplate restTemplate = new OAuth2RestTemplate(resourceDetails);
        restTemplate.getOAuth2ClientContext().getAccessTokenRequest().setAuthorizationCode(code); // <1> 设置 code
        restTemplate.getOAuth2ClientContext().getAccessTokenRequest().setPreservedState("http://127.0.0.1:9090/callback"); // <2> 通过这个方式,设置 redirect_uri 参数
        restTemplate.setAccessTokenProvider(new AuthorizationCodeAccessTokenProvider());
        // 获取访问令牌
        return restTemplate.getAccessToken();
    }
}
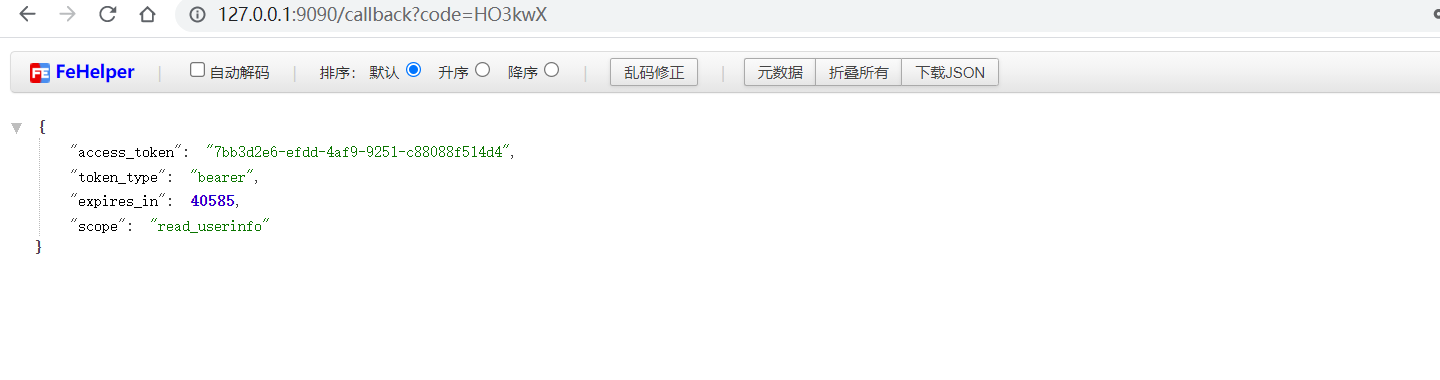
简单测试
通过得到的code来获取相应的token
评论区