


消息队列
ACTIVEMQ

安装消息队列
-
拷贝apache-activemq-5.14.4-bin.tar.gz到Linux服务器的**/opt**下
-
解压缩 tar -zxvf apache-activemq-5.14.4-bin.tar.gz
-
重命名 mv apache-activemq-5.14.4 activemq
-
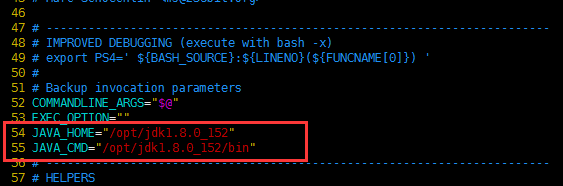
vim /opt/activemq/bin/activemq -
JAVA_HOME="/opt/jdk1.8.0_152" JAVA_CMD="/opt/jdk1.8.0_152/bin" -
-
注册服务 /etc/init.d 使用软连接 ln -s
-
ln -s /opt/activemq/bin/activemq /etc/init.d/activemq -
添加到服务 chkconfig --add activemq -
启动服务 service activemq start -

-
activemq两个重要的端口,一个是提供消息队列的默认端口:61616
另一个是控制台端口8161
-
访问192.168.113.132:8161
-
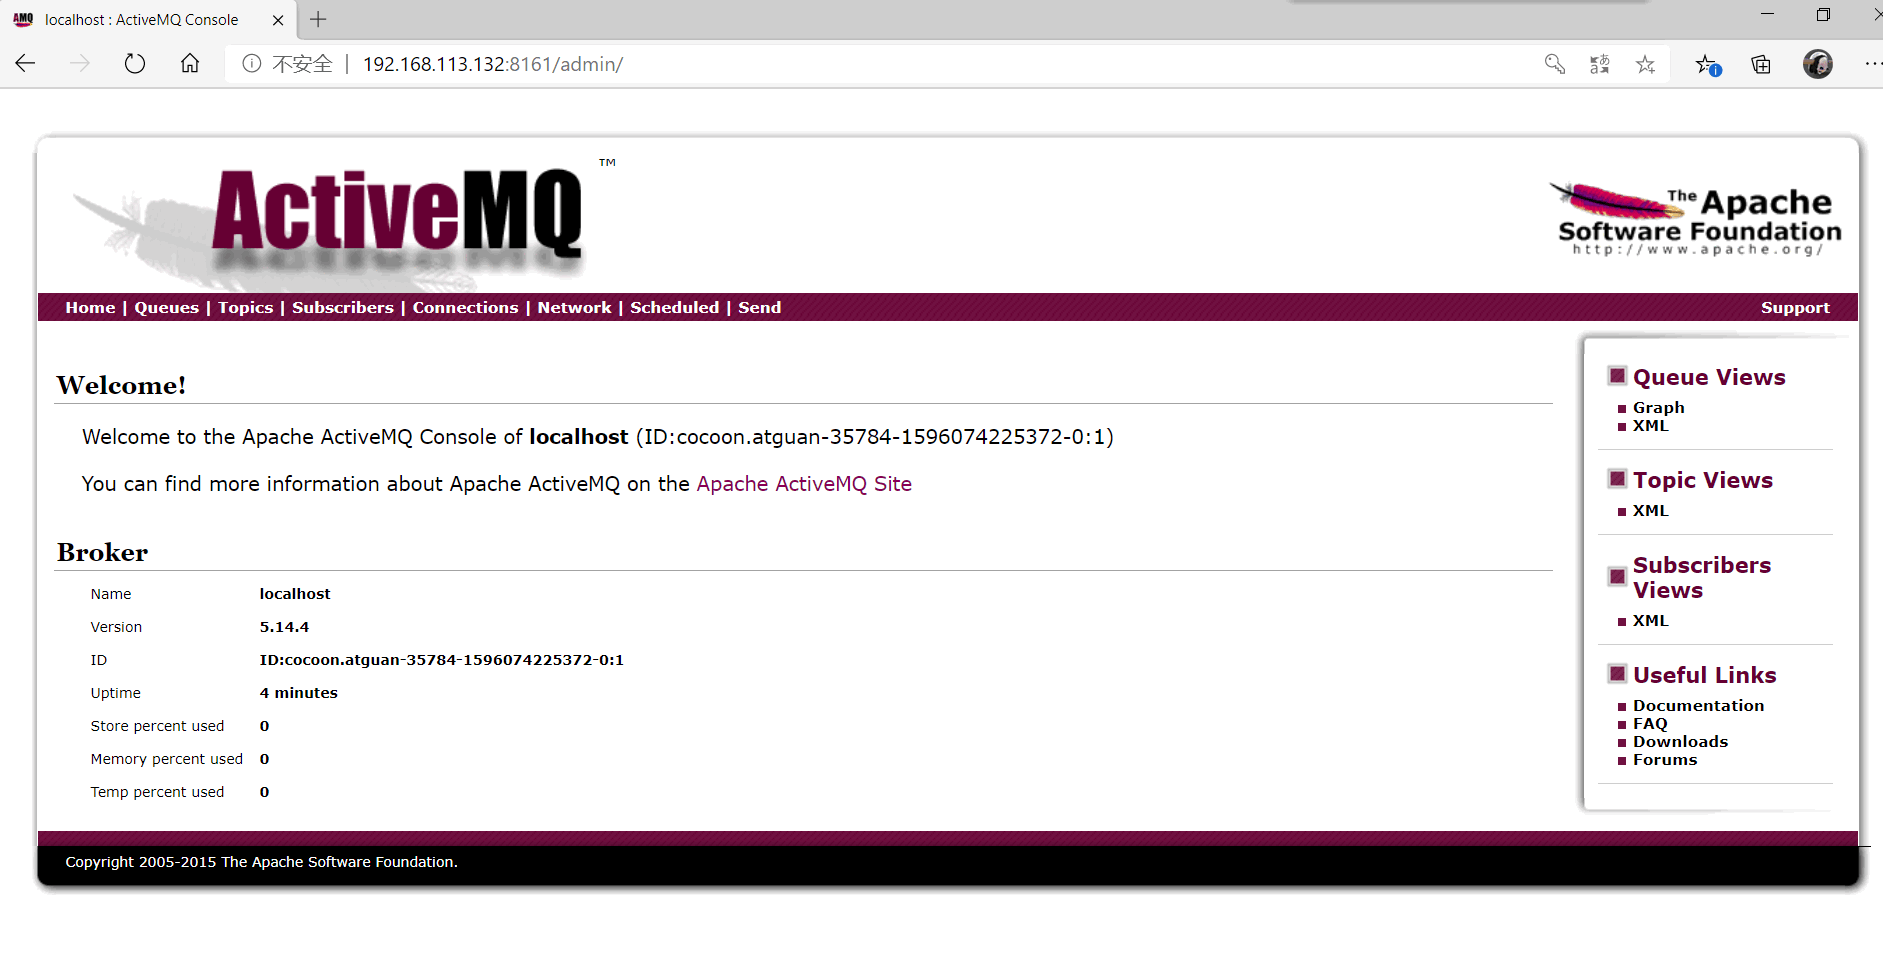
安装完成
ACTIVEMQ测试
-
在pom.xml中添加依赖
<dependency> <groupId>org.springframework.boot</groupId> <artifactId>spring-boot-starter-activemq</artifactId> <exclusions> <exclusion> <groupId>org.slf4j</groupId> <artifactId>slf4j-log4j12</artifactId> </exclusion> </exclusions> </dependency> <dependency> <groupId>org.apache.activemq</groupId> <artifactId>activemq-pool</artifactId> <version>5.15.2</version> <exclusions> <exclusion> <groupId>org.slf4j</groupId> <artifactId>slf4j-log4j12</artifactId> </exclusion> </exclusions> </dependency> -
创建ProducerTest类(提供端)
public class ProducerTest { public static void main(String[] args) throws JMSException { //创建连接工厂 ActiveMQConnectionFactory activeMQConnectionFactory = new ActiveMQConnectionFactory("tcp://192.168.113.132:61616"); //创建连接 Connection connection = activeMQConnectionFactory.createConnection(); //开启连接 connection.start(); //创建session;第一个参数表示是否支持事务,第二个参数表示开启/关闭事务的相应参数 Session session = connection.createSession(false, Session.AUTO_ACKNOWLEDGE); //创建队列 Queue atgaun = session.createQueue("atgaun"); //创建消息提供者 MessageProducer producer = session.createProducer(atgaun); //创建消息对象 ActiveMQTextMessage activeMQTextMessage = new ActiveMQTextMessage(); activeMQTextMessage.setText("很难受"); //发送消息 producer.send(activeMQTextMessage); //关闭 producer.close(); session.close(); connection.close(); } } -
开启事务
//session开启事务 Session session = connection.createSession(true, Session.SESSION_TRANSACTED); -
事务必须提交
//创建连接工厂 ActiveMQConnectionFactory activeMQConnectionFactory = new ActiveMQConnectionFactory("tcp://192.168.113.132:61616"); //创建连接 Connection connection = activeMQConnectionFactory.createConnection(); //开启连接 connection.start(); //创建session;第一个参数表示是否支持事务,第二个参数表示开启/关闭事务的相应参数 //Session session = connection.createSession(false, Session.AUTO_ACKNOWLEDGE); //session开启事务 Session session = connection.createSession(true, Session.SESSION_TRANSACTED); //创建队列 Queue atgaun = session.createQueue("atgaun-true"); //创建消息提供者 MessageProducer producer = session.createProducer(atgaun); //创建消息对象 ActiveMQTextMessage activeMQTextMessage = new ActiveMQTextMessage(); activeMQTextMessage.setText("很难受"); //发送消息 producer.send(activeMQTextMessage); //提交事务 session.commit(); //关闭 producer.close(); session.close(); connection.close(); -
新建ConsumerTest类
public class ConsumerTest { public static void main(String[] args) throws JMSException { //创建连接工厂 ActiveMQConnectionFactory activeMQConnectionFactory = new ActiveMQConnectionFactory(ActiveMQConnectionFactory.DEFAULT_USER,ActiveMQConnectionFactory.DEFAULT_PASSWORD,"tcp://192.168.113.132:61616"); //创建连接 Connection connection = activeMQConnectionFactory.createConnection(); //开启连接 connection.start(); //创建session Session session = connection.createSession(true,Session.SESSION_TRANSACTED); //创建队列 Queue atguan = session.createQueue("atgaun-true"); //创建consumer MessageConsumer consumer = session.createConsumer(atguan); //消费消息,设置一个监听器 consumer.setMessageListener(new MessageListener() { @Override public void onMessage(Message message) { if (message instanceof TextMessage) { try { String text = ((TextMessage) message).getText(); System.err.println(text); } catch (JMSException e) { e.printStackTrace(); } } } }); } } -
此处不需要关闭consumer,因为如果关闭,提供者再发送消息,就会无法接收到
SpringBoot与消息队列整合
将消息队列的工厂注入到spring容器中
ActiveMQUtil类
public class ActiveMQUtil {
   PooledConnectionFactory pooledConnectionFactory = null;
   public  void init(String brokerUrl){
       ActiveMQConnectionFactory activeMQConnectionFactory = new ActiveMQConnectionFactory(brokerUrl);
       pooledConnectionFactory = new PooledConnectionFactory(activeMQConnectionFactory);
       //设置超时时间
       pooledConnectionFactory.setExpiryTimeout(2000);
       // 设置出现异常的时候,继续重试连接
       pooledConnectionFactory.setReconnectOnException(true);
       // 设置最大连接数
       pooledConnectionFactory.setMaxConnections(5);
   }
    // 获取连接
    public Connection getConnection(){
        Connection connection = null;
        try {
            connection = pooledConnectionFactory.createConnection();
        } catch (JMSException e) {
            e.printStackTrace();
        }
        return  connection;
    }
}
ActiveMQConfig
@Configuration
public class ActiveMQConfig {

    @Value("${spring.activemq.broker-url:disabled}")
    String brokerURL ;

    @Value("${activemq.listener.enable:disabled}")
    String listenerEnable;

    // 发送队列
    @Bean
    public ActiveMQUtil getActiveMQUtil(){
        if ("disabled".equals(brokerURL)){
            return null;
        }
        ActiveMQUtil activeMQUtil = new ActiveMQUtil();
        activeMQUtil.init(brokerURL);
        return  activeMQUtil;
    }

    //专门用来配置监听器工厂
    @Bean(name = "jmsQueueListener")
    public DefaultJmsListenerContainerFactory jmsQueueListenerContainerFactory(ActiveMQConnectionFactory activeMQConnectionFactory) {

        if("disabled".equals(listenerEnable)){
            return null;
        }
        DefaultJmsListenerContainerFactory factory = new DefaultJmsListenerContainerFactory();
        factory.setConnectionFactory(activeMQConnectionFactory);
        // 设置事务
        factory.setSessionTransacted(false);
        // 自动签收
        factory.setSessionAcknowledgeMode(Session.AUTO_ACKNOWLEDGE);
        // 设置并发数
        factory.setConcurrency("5");
        // 重连间隔时间
        factory.setRecoveryInterval(5000L);

        return factory;
    }

    // 接收消息的工厂
    @Bean
    public ActiveMQConnectionFactory activeMQConnectionFactory ( ){
        ActiveMQConnectionFactory activeMQConnectionFactory =
                new ActiveMQConnectionFactory(brokerURL);
        return activeMQConnectionFactory;
    }
}
消息队列与业务整合
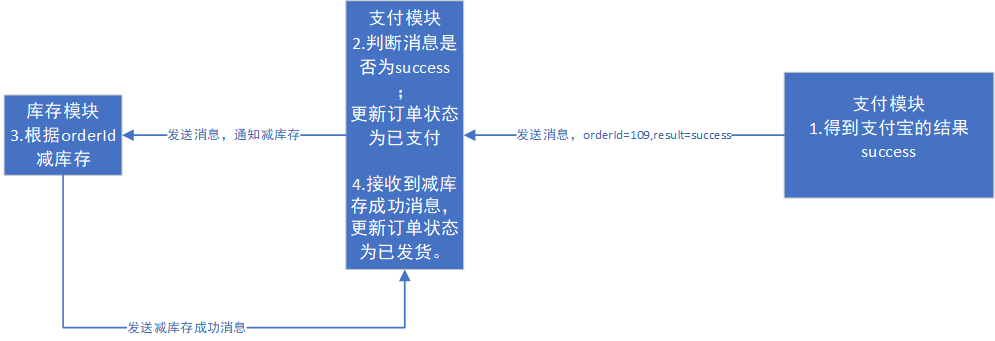
当支付成功之后,通过异步回调结果来通知订单!
controller
//异步回调
    @RequestMapping("alipay/callback/notify")
    public String callbacknotify(@RequestParam Map<String, String> paramsMap,HttpServletRequest request) {

        //paramsMap = ... //将异步通知中收到的所有参数都存放到map中
        boolean signVerified = false; //调用SDK验证签名
        try {
            signVerified = AlipaySignature.rsaCheckV1(paramsMap, AlipayConfig.alipay_public_key, AlipayConfig.charset, AlipayConfig.sign_type);
        } catch (AlipayApiException e) {
            e.printStackTrace();
        }

        String out_trade_no = paramsMap.get("out_trade_no");

        if(signVerified){
            //

            //对业务的二次校验
            //只有交易通知状态为 TRADE_SUCCESS 或 TRADE_FINISHED 时,支付宝才会认定为买家付款成功。
            //需要得到trade_status
            String trade_status = paramsMap.get("trade_status");
            if ("TRADE_SUCCESS".equals(trade_status)||"TRADE_FINISHED".equals(trade_status)) {

                //根据out_trade_no查询paymentInfo
                PaymentInfo paymentInfo = new PaymentInfo();
                paymentInfo.setOutTradeNo(out_trade_no);
                PaymentInfo paymentInfoHas = paymentService.getPaymentInfo(paymentInfo);

                if (paymentInfoHas.getPaymentStatus()==PaymentStatus.PAID || paymentInfoHas.getPaymentStatus()==PaymentStatus.ClOSED) {
                    return "failure";
                }

                //更新交易记录状态
                PaymentInfo paymentInfoUPD = new PaymentInfo();
                paymentInfoUPD.setPaymentStatus(PaymentStatus.PAID);
                paymentInfoUPD.setCallbackTime(new Date());
                paymentService.updatePaymentInfo(out_trade_no,paymentInfoUPD);
                //消息队列
                paymentService.sendPaymentResult(paymentInfoHas,"success");
                return "success";
            }

        }else{
            //

            return "failure";
        }
        return "failure";

    }
service.impl
public void sendPaymentResult(PaymentInfo paymentInfo, String result) {

        //创建连接
        Connection connection = activeMQUtil.getConnection();

        try {
            //打开连接
            connection.start();
            //创建session
            Session session = connection.createSession(true, Session.SESSION_TRANSACTED);
            //创建队列
            Queue payment_result_queue = session.createQueue("PAYMENT_RESULT_QUEUE");
            //创建消息提供者
            MessageProducer producer = session.createProducer(payment_result_queue);
            //创建消息对象
            ActiveMQMapMessage activeMQMapMessage = new ActiveMQMapMessage();
            activeMQMapMessage.setString("orderId",paymentInfo.getOrderId());
            activeMQMapMessage.setString("result",result);

            //发送消息
            producer.send(activeMQMapMessage);
            //提交
            session.commit();
            //关闭
            producer.close();
            session.close();
            connection.close();
        } catch (JMSException e) {
            e.printStackTrace();
        }

    }
以上是将订单支付成功的结果放入消息队列中
创建消费者处理消息
新建OrderConsumer类
@Component
public class OrderConsumer {


    @Reference
    private OrderService orderService;

    //获取消息队列中的数据
    @JmsListener(destination = "PAYMENT_RESULT_QUEUE",containerFactory = "jmsQueueListener")
    public void consumerPaymentResult(MapMessage mapMessage) throws JMSException {

        String orderId = mapMessage.getString("orderId");
        String result = mapMessage.getString("result");

        //支付成功
        if ("success".equals(result)) {
            orderService.updateOrderStatus(orderId, ProcessStatus.PAID);
        }


    }
}
==这个消费者监听队列中的消息每当队列中有消息存在则消费==
service.impl
//修改订单的状态
public void updateOrderStatus(String orderId, ProcessStatus processStatus) {

        OrderInfo orderInfo = new OrderInfo();
        orderInfo.setId(orderId);
        orderInfo.setProcessStatus(processStatus);
        orderInfo.setOrderStatus(processStatus.getOrderStatus());
        orderInfoMapper.updateByPrimaryKeySelective(orderInfo);
    }
订单模块发送减库存通知
完善OrderConsumer类
//支付成功
        if ("success".equals(result)) {
            orderService.updateOrderStatus(orderId, ProcessStatus.PAID);

            //发送消息给库存模块,通知减库存
            orderService.sendOrderStatus(orderId);

            //更新订单状态为已通知仓库
            orderService.updateOrderStatus(orderId,ProcessStatus.NOTIFIED_WARE);
        }
service.impl
@Override
    public void sendOrderStatus(String orderId) {

        //获取连接
        Connection connection = activeMQUtil.getConnection();

        String orderInfoJson = initWareOrder(orderId);
        //创建session
        try {

            //开启连接
            connection.start();
            //获取session
            Session session = connection.createSession(true, Session.SESSION_TRANSACTED);
            //创建队列
            Queue order_result_queue = session.createQueue("ORDER_RESULT_QUEUE");
            //创建提供者
            MessageProducer producer = session.createProducer(order_result_queue);
            //创建消息
            ActiveMQTextMessage activeMQTextMessage = new ActiveMQTextMessage();
            //orderInfo组成的字符串
            activeMQTextMessage.setText(orderInfoJson);
            //放入消息
            producer.send(activeMQTextMessage);
            //提交
            session.commit();
            //关闭
            producer.close();
            session.close();
            connection.close();

        } catch (JMSException e) {
            e.printStackTrace();
        }
    }

    /**
     * 生成JSON字符串
     * @param orderId
     * @return
     */
    private String initWareOrder(String orderId) {

        //根据orderId查询orderInfo
        OrderInfo orderInfo = getOrderInfo(orderId);

        //将orderInfo中有用的数据封装进map中
        Map map = initWareOrder(orderInfo);

        return JSON.toJSONString(map);
    }

    private Map initWareOrder(OrderInfo orderInfo) {

        Map<String,Object> map = new HashMap<>();

        //为map赋值
        map.put("orderId",orderInfo.getId());
        map.put("consignee", orderInfo.getConsignee());
        map.put("consigneeTel",orderInfo.getConsigneeTel());
        map.put("orderComment",orderInfo.getOrderComment());
        map.put("deliveryAddress",orderInfo.getDeliveryAddress());
        map.put("paymentWay","2");

        List<OrderDetail> orderDetailList = orderInfo.getOrderDetailList();

        //创建一个集合存放map
        List<Map> list = new ArrayList<>();
        for (OrderDetail orderDetail : orderDetailList) {
            Map<String,Object> orderDetailMap = new HashMap<>();
            orderDetailMap.put("skuId",orderDetail.getSkuId());
            orderDetailMap.put("skuNum",orderDetail.getSkuNum());
            orderDetailMap.put("skuName",orderDetail.getSkuName());

            list.add(orderDetailMap);
        }

        map.put("details",list);
        return map;

    }
消费减库存结果
==给订单模块发送减库存消息后订单模块发出库存减少成功消息==
在OrderConsumer类中新增方法
//消费减库存成功的消息
    @JmsListener(destination = "SKU_DEDUCT_QUEUE",containerFactory = "jmsQueueListener")
    public void consumeSkuDeduct(MapMessage mapMessage) throws JMSException {

        String orderId = mapMessage.getString("orderId");
        String result = mapMessage.getString("status");

        //减库存成功
        if ("DEDUCTED".equals(result)) {

            //减库存成功,更新订单状态为以结束
            orderService.updateOrderStatus(orderId, ProcessStatus.DELEVERED);

        }
    }
整个业务在消息队列中的流程图如下:
评论区