


Gateway 集成 Sentinel 实现网关限流
Gateway 集成 Sentinel 实现网关静态限流规则
-
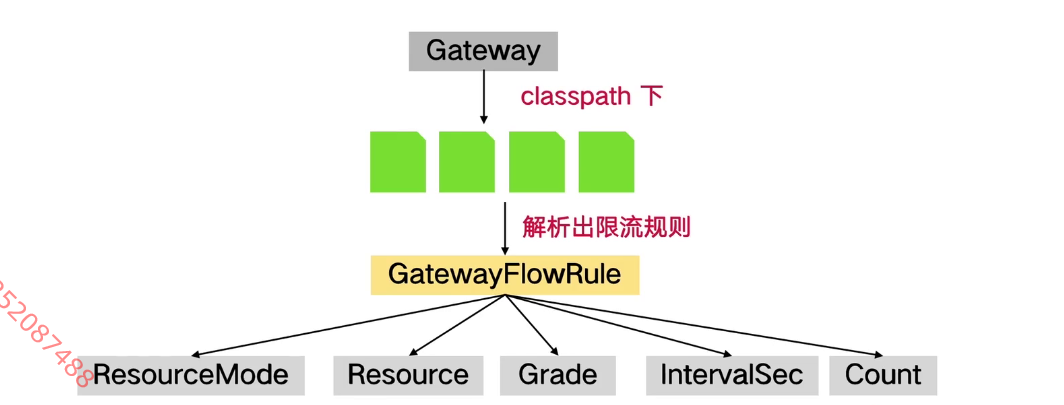
最简单、也是常用的测试方式:在网关内硬编码实现对请求的限流
-
重启
Sentinel Dashboard// 启动 sentinel 对网关 gateway 的支持 nohup java -Dserver.port=7777 -Dcsp.sentinel.app.type=1 -Dcsp.sentinel.dashboard.server=localhost:7777 -Dproject.name=e-commerce-gateway -jar ../sentinel-dashboard-1.8.2.jar > sentinel.log & -
创建
SentinelGatewayConfiguration/** * @author Guank * @version 1.0 * @description: Gateway 集成 sentinel 实现限流 * @date 2022-07-31 8:38 */ @Slf4j @Configuration public class SentinelGatewayConfiguration { /** 视图解析器 */ private final List<ViewResolver> viewResolvers; /** HTTP 请求和响应数据的编解码配置 */ private final ServerCodecConfigurer serverCodecConfigurer; /** * <h2>构造方法</h2> * */ public SentinelGatewayConfiguration( ObjectProvider<List<ViewResolver>> viewResolversProvider, ServerCodecConfigurer serverCodecConfigurer ) { this.viewResolvers = viewResolversProvider.getIfAvailable(Collections::emptyList); this.serverCodecConfigurer = serverCodecConfigurer; } /** * <h2>限流异常处理器, 限流异常出现时, 执行到这个 handler</h2> * */ @Bean @Order(Ordered.HIGHEST_PRECEDENCE) public SentinelGatewayBlockExceptionHandler sentinelGatewayBlockExceptionHandler() { // 默认会返回错误 message, code 429 return new SentinelGatewayBlockExceptionHandler( this.viewResolvers, this.serverCodecConfigurer ); } /** * <h2>限流过滤器, 是 Gateway 全局过滤器, 优先级定义为最高</h2> * */ @Bean @Order(Ordered.HIGHEST_PRECEDENCE) public GlobalFilter sentinelGatewayFilter() { return new SentinelGatewayFilter(); } /** * <h2>初始化限流规则</h2> * */ @PostConstruct public void doInit() { log.info("---------------------------------------------------"); // 加载网关限流规则 log.info("load sentinel gateway rules (code define)"); initGatewayRules(); log.info("---------------------------------------------------"); } /** * <h2>硬编码网关限流规则</h2> * */ private void initGatewayRules() { Set<GatewayFlowRule> rules = new HashSet<>(); GatewayFlowRule rule = new GatewayFlowRule(); // 指定限流模式, 根据 route_id 做限流, 默认的模式 rule.setResourceMode(SentinelGatewayConstants.RESOURCE_MODE_ROUTE_ID); // 指定 route_id -> service id rule.setResource("e-commerce-nacos-client"); // 按照 QPS 限流 rule.setGrade(RuleConstant.FLOW_GRADE_QPS); // 统计窗口和限流阈值 rule.setIntervalSec(60); rule.setCount(3); rules.add(rule); // 加载到网关中 GatewayRuleManager.loadRules(rules); } } -
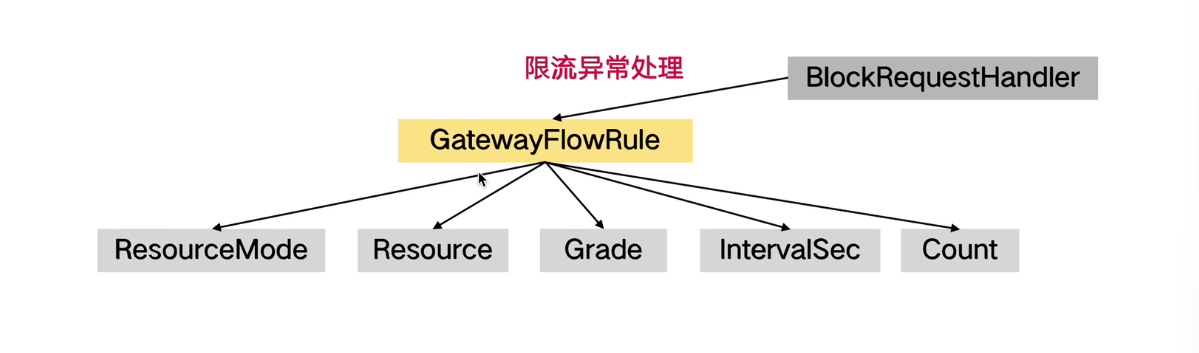
自定义限流过滤处理器
/** * <h2>自定义限流异常处理器</h2> * */ private void initBlockHandler() { // 自定义 BlockRequestHandler BlockRequestHandler blockRequestHandler = new BlockRequestHandler() { @Override public Mono<ServerResponse> handleRequest(ServerWebExchange serverWebExchange, Throwable throwable) { log.error("------------- trigger gateway sentinel rule -------------"); Map<String, String> result = new HashMap<>(); result.put("code", String.valueOf(HttpStatus.TOO_MANY_REQUESTS.value())); result.put("message", HttpStatus.TOO_MANY_REQUESTS.getReasonPhrase()); result.put("route", "e-commerce-nacos-client"); return ServerResponse .status(HttpStatus.TOO_MANY_REQUESTS) .contentType(MediaType.APPLICATION_JSON) .body(BodyInserters.fromValue(result)); } }; // 设置自定义限流异常处理器 GatewayCallbackManager.setBlockHandler(blockRequestHandler); } ------------------------------------------------------------------------------------------------ /** * <h2>初始化限流规则</h2> * */ @PostConstruct public void doInit() { log.info("---------------------------------------------------"); // 加载网关限流规则 log.info("load sentinel gateway rules (code define)"); initGatewayRules(); // 加载自定义限流异常处理器 initBlockHandler(); log.info("---------------------------------------------------"); } -
自定义限流分组来实现对
url的限流通过
route_id来限流是对一整个微服务的所有url进行限流 粒度太大 所以我们可以使用自定义的限流分组对特定的url进行限流// 设置限流分组 /** * <h2>硬编码网关限流规则</h2> * */ private void initGatewayRules() { Set<GatewayFlowRule> rules = new HashSet<>(); GatewayFlowRule rule = new GatewayFlowRule(); // 指定限流模式, 根据 route_id 做限流, 默认的模式 rule.setResourceMode(SentinelGatewayConstants.RESOURCE_MODE_ROUTE_ID); // 指定 route_id -> service id rule.setResource("e-commerce-nacos-client"); // 按照 QPS 限流 rule.setGrade(RuleConstant.FLOW_GRADE_QPS); // 统计窗口和限流阈值 rule.setIntervalSec(60); rule.setCount(3); // rules.add(rule); // 限流分组, Sentinel 先去找规则定义, 再去找规则中定义的分组 rules.add( new GatewayFlowRule("nacos-client-api-1") .setCount(3).setIntervalSec(60) ); rules.add( new GatewayFlowRule("nacos-client-api-2") .setCount(1).setIntervalSec(60) ); // 加载到网关中 GatewayRuleManager.loadRules(rules); // 加载限流分组 initCustomizedApis(); } ----------------------------------------------------------------------------------------------------- // 设置限流分组 /** * <h2>硬编码网关限流分组</h2> * 1. 最大限制 - 演示 * 2. 具体的分组 * */ private void initCustomizedApis() { Set<ApiDefinition> definitions = new HashSet<>(); // nacos-client-api 组, 最大的限制 ApiDefinition api = new ApiDefinition("nacos-client-api") .setPredicateItems(new HashSet<ApiPredicateItem>() {{ // 模糊匹配 /imooc/ecommerce-nacos-client/ 及其子路径的所有请求 add(new ApiPathPredicateItem() .setPattern("/imooc/ecommerce-nacos-client/**") // 根据前缀匹配 .setMatchStrategy(SentinelGatewayConstants.URL_MATCH_STRATEGY_PREFIX)); }}); // nacos-client-api-1 分组 ApiDefinition api1 = new ApiDefinition("nacos-client-api-1") .setPredicateItems(new HashSet<ApiPredicateItem>() {{ add(new ApiPathPredicateItem() // 精确匹配 /imooc/ecommerce-nacos-client/nacos-client/service-instance .setPattern("/imooc/ecommerce-nacos-client" + "/nacos-client/service-instance")); }}); // nacos-client-api-2 分组 ApiDefinition api2 = new ApiDefinition("nacos-client-api-2") .setPredicateItems(new HashSet<ApiPredicateItem>() {{ add(new ApiPathPredicateItem() // 精确匹配 /imooc/ecommerce-nacos-client/nacos-client/project-config .setPattern("/imooc/ecommerce-nacos-client" + "/nacos-client/project-config")); }}); definitions.add(api1); definitions.add(api2); // 加载限流分组 GatewayApiDefinitionManager.loadApiDefinitions(definitions); }
使用本地文件实现 Gateway 集成 Sentinel 实现网关静态限流
- 使用硬编码工作较多,且相对来说比较繁琐;熟悉之后,可以进一步使用配置文件的形式
resource:限流的资源名称
resourceMode:0 根据服务名(routeId)限流 1 根据api分组
count:限流阈值
intervalSec:滑动窗口的统计时间
-
在Resource目录下存放Json文件
gateway-flow-rule-sentinel.json
[
  {
    "resource": "e-commerce-nacos-client",
    "resourceMode": 0,
    "count": 3,
    "intervalSec": 60
  },
  {
    "resource": "nacos-client-api",
    "resourceMode": 1,
    "count": 1,
    "intervalSec": 60
  }
]
gateway-flow-rule-api-sentinel.json
[ { "apiName": "nacos-client-api", "predicateItems": [ { "pattern": "/imooc/ecommerce-nacos-client/nacos-client/project-config" }, { "pattern": "/imooc/ecommerce-nacos-client/**", "matchStrategy": 1 } ] } ] -
在
bootstrap.yml文件中设置配置文件的路径spring: application: name: e-commerce-gateway cloud: nacos: discovery: enabled: true # 如果不想使用 Nacos 进行服务注册和发现, 设置为 false 即可 server-addr: 192.168.0.103:8848 # Nacos 服务器地址 namespace: f2dfb4c7-a6cf-45d5-92e2-3912daf808d0 metadata: management: context-path: ${server.servlet.context-path}/actuator sentinel: eager: true transport: port: 8720 dashboard: 127.0.0.1:7777 datasource: # 通过本地文件方式, 基于服务级别的配置 ds1.file: file: classpath:gateway-flow-rule-sentinel.json # 代表服务级别的限流, 一步步点进去看, 文件类型 ruleType: gw-flow # 通过本地文件方式, 细粒度对指定 api 进行配置 ds2.file: file: classpath:gateway-flow-rule-api-sentinel.json # 代表 API 分组, 一步步点进去看, 文件类型 ruleType: gw-api-group
使用Nacos 实现 Gateway 实现动态限流

-
在Nacos中增加 限流配置文件
[
  {
    "apiName": "nacos-client-api",
    "predicateItems": [
      {
        "pattern": "/imooc/ecommerce-nacos-client/nacos-client/project-config"
      },
      {
        "pattern": "/imooc/ecommerce-nacos-client/**",
        "matchStrategy": 1
      }
    ]
  }
]
[ { "resource": "e-commerce-nacos-client", "resourceMode": 0, "count": 3, "intervalSec": 60 }, { "resource": "nacos-client-api", "resourceMode": 1, "count": 1, "intervalSec": 60 } ]
-
在
bootstrap.yml文件中配置限流规则的数据源spring: application: name: e-commerce-gateway cloud: nacos: discovery: enabled: true # 如果不想使用 Nacos 进行服务注册和发现, 设置为 false 即可 server-addr: 192.168.0.103:8848 # Nacos 服务器地址 namespace: f2dfb4c7-a6cf-45d5-92e2-3912daf808d0 metadata: management: context-path: ${server.servlet.context-path}/actuator sentinel: eager: true transport: port: 8720 dashboard: 127.0.0.1:7777 datasource: # # 通过本地文件方式, 基于服务级别的配置 # ds1.file: # file: classpath:gateway-flow-rule-sentinel.json # # 代表服务级别的限流, 一步步点进去看, 文件类型 # ruleType: gw-flow # # 通过本地文件方式, 细粒度对指定 api 进行配置 # ds2.file: # file: classpath:gateway-flow-rule-api-sentinel.json # # 代表 API 分组, 一步步点进去看, 文件类型 # ruleType: gw-api-group # 集成 Nacos ds1: nacos: server-addr: ${spring.cloud.nacos.discovery.server-addr} namespace: ${spring.cloud.nacos.discovery.namespace} # 测试时, 看看 Nacos 中修改是否能让 dashboard 生效, 就把第二个 count 也修改为 3 data-id: gateway-flow-rule-sentinel group-id: DEFAULT_GROUP data-type: json rule-type: gw-flow ds2: nacos: server-addr: ${spring.cloud.nacos.discovery.server-addr} namespace: ${spring.cloud.nacos.discovery.namespace} data-id: gateway-flow-rule-api-sentinel group-id: DEFAULT_GROUP data-type: json rule-type: gw-api-group
评论区